Monday, June 29, 2009
Starting to add some character....
Labels:
Adding the human touch.
Saturday, June 27, 2009
Making the protal look better.....
It doesn't look that great yeat, but it's getting there. First of all, I paint it a light gray, almost cement color. Then I'll touch it up later.
Labels:
Tunell Portal improvment.
My first building.....
I had to dig out a hole, into my street, to allow the store to sit right on the table, then fill in the cracks with dry wall mud. Hopefully, after a little sanding and some paint, it will be level with the ground of the store.
Also, you can see that I added my little Railroad Crossing painted on the street. I did that with a satalite photo of a street in American Fork with a Railroad Crossing on it. Then I traced the symbol in Illustrator and then scaled it down to size. Not bad for a first attempt 'eh?
Don't like the name of the store, gonna have to come up with one of my own. :)
Labels:
laying the foundation.
Saturday, June 13, 2009
What we have so far.
Here's what our new house looks like so far. Kind of bland, I know, but we'll have to add some green, a yard, tree's, kids playing, etc.
I picked up a couple little cars from the hobby store to get an idea of scale before moving onto the next step with the roads. Want to make the lanes the right size.
My wife and I, building our first home together.
For a Saturday evening project, my wife, Malinda, helped me build our first home together. It's a little small, but we like it. :)

The portal...
As you can see, the track, that my dad and I repaired, still needs a little work.
Labels:
Making an inviting entry way.
Repairing some damaged track.
My dad brought his solder gun and helped me repair some damaged track and add the two ends together. It was a risky chore, but it turned out well. After adding the solder between the two tracks and where the connectors were, we had to sand them down smooth so that the train cars can glide across easily.
Labels:
Solder and a file.
Wednesday, June 10, 2009
Putting down some asphault.
I used just regular dry wall mud that my dad gave me to lay down the road. Of course, I drew out exactly where I wanted the streets to go before hand. I'm not sure if this will work or not, but we'll find out. When it's dried I will sand it smooth and then paint it.

Labels:
Try something new for pavement.
Sunday, June 7, 2009
Some hikers enjoying the view....
Still got a ways to go, but it's starting to get the look that I am striving for. Still kind of bare plane trees, but I'll find something to do with them. Here's a shot of a couple hikers at the top of the mountain enjoying the wonderful view.
Labels:
Top of the world mom.
Friday, June 5, 2009
Labels:
Closeup of trees.
Additonal color to the surface....
Made a different color of ground cover, blending up foam rubber the same way only this time using brown and red paint. Gave it a nice autumn feel. I also bought some moss cover at a craft store, that made nice little green pastures. Then, after drilling some holes, started putting my trees on the mountains. They are still kind of bare, because I haven't found a way to add texture to them the way that I like. I'll need to make many many more tree's anyway.
Also you can see that I sketched out a layout of the town and where I plan to put things.
Labels:
Putting trees on the mountain.
Tuesday, June 2, 2009
Train Play!

Oh, in case you are wondering, here is a documentary that I filmed about the Golden State Model Railroad Museum. It's a really fun film, if you like model trains. My very first commissioned film.
Here is some links with more information on the film, trailer, and where you can order a copy.
Labels:
A film I created,
about model trains.
Monday, June 1, 2009
Lit'l shrubs here and there....
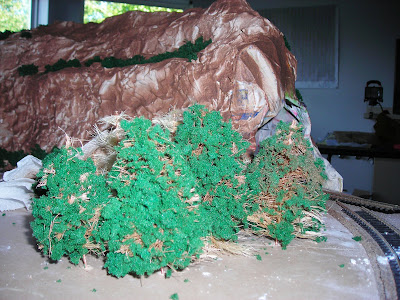
The ground cover, however, makes fairly nice shrubs and bushes, which I have added to several spots on my mountain side.
Labels:
More need for green.
Touchup on the trees.....
Okay, so I sprayed the trees with brown spray paint (the same paint I used for the texture on my mountain) and then coverd them in the ground cover that I made giving them this look. I must say, I'm not too terribly impressed. I think the ground cover is too thick and doesn't give the tree the fine look that I was hoping for. So, before I ruin any of my other trees, I think I'm going to have to try something else.
Labels:
Tree Texture.....
Subscribe to:
Posts (Atom)