Sunday, December 6, 2009

Baseball field fence........


I realize it's been awhile since my last posting. I put the model railroading away for a little while. But lately, I finished my chainlink fence backdrop behind the catcher in my baseball field. Used some wire mesh and some wedding tule.
Take a look!


Tuesday, July 21, 2009

Train trial run!

We tried my little train for the first time on my layout and it seemed to work great! Cool huh? Check it out for yourself!


Sunday, July 19, 2009

Telephone poles....

With some tiny wood dowells and some black thread I was able to make some fairly realistic telephone poles. Still a few details that need to be added to them, but so far, they are off to a good start.

Saturday, July 11, 2009

Adding the Mountain Climbers.

So, now it's time to add some suicidal dudes scaling the cliff face. I used a special kind of thread, that has multiple threads together that closely resembled ropes. And with a little glue there they are, larger than life. Yet really small. :)

Monday, July 6, 2009

Cars and signs....


I made a fence out of some wedding tule and some nails. Then I cut the tops of the nails off. Doesn't look bad, for starters. I may come up with another more effective method later on, but for the time being it looks cool. Also, some cars and a few road signs. The road signs are printed really small on photo paper. The posts are just tooth picks cut to size.

Monday, June 29, 2009

Starting to add some character....

Nothing brings a model railroad layout alive like people. And if I want my layout to be interesting, I am planning to add a lot of people everywhere. It will be fun once it is a beehive of activity and there are little fun things to see all over the place. People are what add a story to layouts. So, I've started with these people. There will be many more to come and stories will come with them.

Saturday, June 27, 2009

Making the protal look better.....


It doesn't look that great yeat, but it's getting there. First of all, I paint it a light gray, almost cement color. Then I'll touch it up later.

My first building.....


I had to dig out a hole, into my street, to allow the store to sit right on the table, then fill in the cracks with dry wall mud. Hopefully, after a little sanding and some paint, it will be level with the ground of the store.

Also, you can see that I added my little Railroad Crossing painted on the street. I did that with a satalite photo of a street in American Fork with a Railroad Crossing on it. Then I traced the symbol in Illustrator and then scaled it down to size. Not bad for a first attempt 'eh?

Don't like the name of the store, gonna have to come up with one of my own. :)

Saturday, June 13, 2009

What we have so far.

Here's what our new house looks like so far. Kind of bland, I know, but we'll have to add some green, a yard, tree's, kids playing, etc.
I picked up a couple little cars from the hobby store to get an idea of scale before moving onto the next step with the roads. Want to make the lanes the right size.

My wife and I, building our first home together.


For a Saturday evening project, my wife, Malinda, helped me build our first home together. It's a little small, but we like it. :)

The portal...

Now it's time to add our entry tunnel portal. Had to build around it a little bit, and right now it's kind of ugly, as a lot of a train layouts look before including the finishing touches. But it will look awesome, hopefully, when it's done.
As you can see, the track, that my dad and I repaired, still needs a little work.

Repairing some damaged track.


My dad brought his solder gun and helped me repair some damaged track and add the two ends together. It was a risky chore, but it turned out well. After adding the solder between the two tracks and where the connectors were, we had to sand them down smooth so that the train cars can glide across easily.

Wednesday, June 10, 2009

Putting down some asphault.

I used just regular dry wall mud that my dad gave me to lay down the road. Of course, I drew out exactly where I wanted the streets to go before hand. I'm not sure if this will work or not, but we'll find out. When it's dried I will sand it smooth and then paint it.


Sunday, June 7, 2009

Some hikers enjoying the view....


Still got a ways to go, but it's starting to get the look that I am striving for. Still kind of bare plane trees, but I'll find something to do with them. Here's a shot of a couple hikers at the top of the mountain enjoying the wonderful view.

How does it look with little people?


So, I'm still making more trees and putting down bushes and ground cover. But my mountain is starting to look impressive. Again, here is a shot with my hiker mom and her son. (Note the baseball diamond in the background that my wife drew to HO scale that I will be putting in later.)


Friday, June 5, 2009


Just a close up of the trees on the hillside.

Additonal color to the surface....


Made a different color of ground cover, blending up foam rubber the same way only this time using brown and red paint. Gave it a nice autumn feel. I also bought some moss cover at a craft store, that made nice little green pastures. Then, after drilling some holes, started putting my trees on the mountains. They are still kind of bare, because I haven't found a way to add texture to them the way that I like. I'll need to make many many more tree's anyway.

Also you can see that I sketched out a layout of the town and where I plan to put things.

Tuesday, June 2, 2009

Train Play!


Oh, in case you are wondering, here is a documentary that I filmed about the Golden State Model Railroad Museum. It's a really fun film, if you like model trains. My very first commissioned film.
Here is some links with more information on the film, trailer, and where you can order a copy.


Monday, June 1, 2009

Lit'l shrubs here and there....


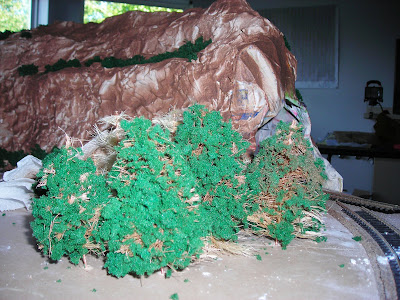
The ground cover, however, makes fairly nice shrubs and bushes, which I have added to several spots on my mountain side.

Touchup on the trees.....


Okay, so I sprayed the trees with brown spray paint (the same paint I used for the texture on my mountain) and then coverd them in the ground cover that I made giving them this look. I must say, I'm not too terribly impressed. I think the ground cover is too thick and doesn't give the tree the fine look that I was hoping for. So, before I ruin any of my other trees, I think I'm going to have to try something else.

Sunday, May 31, 2009

Add some green....


In this economy, green is hard to come by, money green that is. And because I don't have a ton of money to shove into this project, I have to make as much as I can. My tree's for example. So, I decited to make some ground cover out of foam cubes that I put in a blender, and then mixed with green paint, and left in the sun to dry. Looks like it came out okay.

Getting a little grove going....


My trees looked better and better each time I made one. Again, I put my little hiker mom, and her son, in front of my grove to compare them to scale. But, they still look a little bland.

Time for some trees....


I made some trees out of some pliars, wire, and fibers from some sisel twine, untreated. Took a little time to get the technique down, but after awhile, my trees started looking better and better.

Mountain making progress....


Now the plaster is complete, the track is complete, and I added a little spray paint. I purchased the special kind of brown earth tone spray paint from Home Depot that had the special texture to it. Sprayed it on inconsistantly, so some areas were darker than others.

If you do this at home, make sure it's a well ventalated area. Have a fan or something. I only had the outside door open and the house smelled of fumes for about 3 hours. I had an awful headach. Yeah, this is a first attempt, learn as I go project. :)


Plaster on the mountain...


I opened up a little case of the people that I purchased and stuck a hicker woman and her son at the top of my mountain, just to get a feel. The plastering process has begun, and I carded the dried plaster a little bit so that it wouldn't look so much like plaster. But, only covered about 20% of the mountain. So, down to Home Depot to get some more plaster.

Time to get messy....


Some paper mache on the mountain for starters to give it a little bit of surface. Some people like playing in paper mache, but not me. It's messy and smelly, but it is part of the fun.

Also you can see I started laying my track. Not a perfect circle because I had flex track, but still it works. Not bad for my first try.

I also learned not to use a nice surfaced table. Because the surface is so hard, most nails will not go through it. So I had to drill a hole thorugh the hard surface everywhere I wanted to place a nail and cause a lot of extra work and headaches. Yes, the surface is nice and smooth to work with, but hardly worth it.

Also, you can see in the far left, the track is not complete yet. I ran out of track and needed to run to the hobby shop to pick up another one, which I did a few days later. I got excited and wanted to work on my mountain. So, now I have to lay the rest of the track with the mountain up. And with the hard surface, it was difficult to get into that moutnain.

And now, start with the mountain....


Okay, so now I have the roadbed laid down. I got some old wire that is used for growing tomato plants and stuff, kind of like chicken wire, but a little stronger, and I nailed it to the table using some U nails. Then I conformed it as I thought looked natural and cool look'n.

Starting my model train....


I brought home an old table that my dad wanted to throw away after a garage sale. Thought it might be kind of nice to start small. Besides, you can do a lot, with this little amount of space. Thougth I would start with just a round track. I used a flexible track, because I wanted the circle a little bit larger than usual. So, clearly, I started with some roadbed.